Lucky Blocks
A block pattern is published each month in the newsletter. Members are encouraged to make a block (or several) to turn in at the next meeting. Members receive one chance, for each block they turn in, to win a set of blocks. One set of blocks per participant per drawing.
If you make two blocks, one for guild and one for yourself, you will have a quilt top at the end of the year. Everyone who finishes and shares their finished quilt top will be entered to win a prize! If you need help, please call or email Laurie Paurazas and she will answer any questions you may have.
When Flying Geese Collide


Pebbles in the Stream
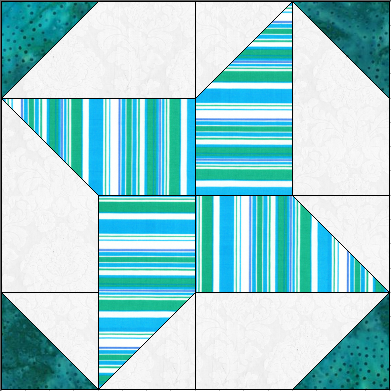
 A “Two-fer” Lucky Block
This is a fast, fabulous block to make two at a time
Fabrics – Batiks or Prints - think Nature J
Select two coordinating fabrics that are the colors of water– Blues, Aquas and Greens
You need two - 2½” by at least 40½” - WOF strips from coordinating colors to cut two complete blocks at one time. Jelly Roll strips are fine if they are 40½” or longer.
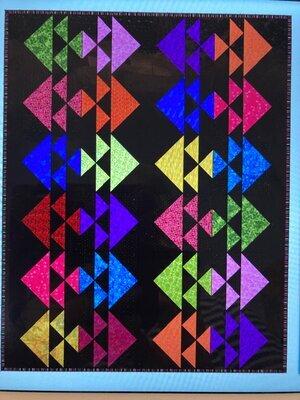
August Lucky Block
Jagged X
Colors - 2 Bright Colors in a Tone on Tone, Batik, or Print that read as one color. Any Colors you like.
Background – Black solid, Print, or Tone on Tone that reads very black

Cutting Instructions for 1 – Block (6½ unfinished)
Color 1 - (1) 3½”x 5” rectangle
Color 2 - (1) 3½”x 5” rectangle
Black - (2) 3½”x 5” rectangles
1. Lay a 3½” Black rectangle Right Side Down as in Fig A. Make a mark on the back 1½” over from the bottom left corner as in FIG A. Draw a diagonal Line from the mark to the top right corner as shown.
VIP The direction of the line is very important
2. Lay the Black rectangle horizontally over the Color rectangle right sides together as in FIG B and sew on the drawn line.
3. Trim the seam allowance to ¼” as in FIG C and press toward the Black.
4. Repeat with the other Color and Black rectangles.
5. Match the two units together as in the block at the top of the page. Sew and press the center seam open.
6. This is an easy block to make multiples of at the same time. Cut out several color and black rectangles. Match them up and sew, sew, sew!
Questions? Contact Laurie Paurazas
760-216-6234
1½”
Fig A
Fig B
Fig C